The Art of Tea…

In this current climate with social distancing and advice to stay home due to COVID-19, people are doing different things to pass the time.

I decided to make a cup of tea. Well, flower tea to be exact. And I decided to try it the sous vide way, just to see how it would turn out. I did not compare this sous vide tea with those that are boiled over the stove for 30 minutes though. I decided to make it the sous vide way because I did not want to ‘burn’ the ingredients by boiling the water to 100C.

The quickest way to make this is here. I linked this video because it was the easiest to make. There are other videos where the ingredients are boiled for 30 minutes.

This sous vide way was what I attempted. The ingredients used are similar, depending on where you live.

Baby chrysanthemum, dried gojiberries and dried longans.

I had tried this combination at a restaurant and found it delightful. However, I wanted to drink more of it and decided to make it myself. So here is my attempt. This tea is made up of baby chrysanthemum, dried gojiberries and dried longan. For those who are familiar with the Chinese concept of ‘heatiness’ and ‘cooling’, chrysanthemum and gojiberries are normal in that they are neither heaty nor cooling. However, longans are a tad heaty so if you are a person who cannot stand hot weather or heat, take less of these. A person with a ‘cool’ base can generally tolerate hot weather a bit better than someone with a ‘heaty’ base and vice-versa.

Dried gojiberries
Dried baby chrysanthemum
Dried longans

According to the lady at the shop where I had bought my ingredients from, these gojiberries were a better variety and they were larger. The dried longans are from Thailand and after boiling them, they can also be eaten if there is still any taste left in them. There wasn’t much taste left in mine after two rounds of sous vide but I still ate them.

Two sous vides going, the one at the left was at 185F for the dried longans while the one on the right is set for 70 Celsius for both the chrysanthemum and gojiberries. I had not changed the temperature on the left Anova to Celsius so I used it with the preset Fahrenheit readings. The right Anova has the temperature readings in Celsius.
I sous vide one bottle with the ingredients in it and the other jar had only plain water. After 30 minutes, I emptied the jar with the tea and put the ingredients back into the other jar which already had water at the correct temperature, for another 30 minutes.

Ingredients:
I used the following amount of ingredients:
Gojiberries – 1 1/2 tablespoon
Chrysanthemum – 1 1/2 tablespoon
Dried longan – 15-16 pieces

The above were for six cups of water, with another six cups on standby as I wanted to sous vide the ingredients twice.
The rehydrated dried longans
Rehydrated gojiberries
Rehydrated chrysanthemum flowers
Tada! After the sous vide, I mixed the water from the three ingredients together. The first brew is on the right as you can probably tell by the stronger colour. I wanted to brew a third time but decided against it after tasting the second attempt which is the one on the left.
Top view with bits of the three ingredients in it.

I decided on 70C for the flowers and gojiberries because I thought that they were more delicate and therefore did not require too high a temperature to bring out their flavours. The longans were sous vide at 85C as they seemed like more hardy ingredients. I have no idea if I am right. I am just basing this on what I had read about temperatures for making teas.

I love longans so I decided to filter out the rest and left the longans in the glass for eating.

The tea was a little weak. But it was still nice and had antioxidant goodness from the gojiberries. I will add more chrysanthemum flowers the next time. Some people add rock sugar to their tea for greater sweetness. The taste from the chrysanthemum needs to be a tad stronger but I do not need the extra sweetness from rock sugar.

Would I sous vide again? I may not differentiate the temperatures the next time. I liked the sous vide way because I feel like I am not overboiling the ingredients at 100C. But folks without sous vide equipment can make a nice cup of tea just the same. I wanted something to put my mind to while manoeuvring this period of social distancing without resorting to counting rice grains!

Enjoy your cuppa!

Update:

I was hankering for a hot drink and didn’t want anything caffeinated. Then I remembered my tea. Scooping a teaspoon of gojiberries and some longans into a teapot, I poured hot water into it and allowed it to steep for 30 minutes. The pot was sufficient for only two cups.

Tada! Tea is served! I poured in more hot water into the little pot while I savoured this!

Ahhh! Life has meaning after all!

Trying out the Skerton PRO!

I first tried a Hario wooden coffee grinder at a friend’s place. It was a novelty for me as I had not used a manual grinder before. That grinder, however, was not precise enough in its grind and a little hard to grind. After looking around for a better grinder that was still affordable, I got an electric Melitta Molino Electric Burr Grinder. I really liked that grinder. However, I was not using it enough so I gave it away. I settled on a manual grinder that I could periodically use for smaller quantities of beans when friends came around and we could have more of a coffee experience. I came across the Skerton PRO.

This review is not on how to use it. It is whether I found it useful for my needs.

What I liked about it:

It was a good size even for my small hands and the handle was easy to turn.

The burrs were easy enough to adjust and the whole part was washable. The spring mechanism that kept the burrs at their intended distance seem quite sturdy. I have to admit that I had to grind it three times until I got an acceptable coarseness for my filter coffee.

The glass container that held the grounds came with a cover to store any leftover grounds that were not used.

I was able to grind small quantities of coffee beans and when I got tired, I had willing helpers to help me grind some more!

This image has an empty alt attribute; its file name is img_1595.jpg

A friend had some coffee that she had bought while holidaying and did not have anyone to give it to. When she heard that I liked coffee, she gave me the two remaining bags that she had. This is review is about the grinder and not so much the beans. However, for the curious, Finca La Melodia was sour and mild and rather pleasant. At 125g, it was just nice for a small group or three or four people to enjoy. The website was in Spanish and one can look it up here.

The grind here is after the third attempt. I am not sure if it is the right grind size yet. I have tried it with filter coffee and a friend suggested I try this grind size in a cold brew.

The verdict on the Skerton?

I like it and it is fine for small quantities though I have to say that I was somewhat missing the Melitta when I was grinding slightly more. I guess for a novelty, it is fine, and there are always people who are keen to try their hand at grinding. The feel and make of the grinder is great, and if one is using it to grind daily, it is more than sufficient. Some people find grinding rather therapeutic so daily grind therapy can be had though I tend to grind enough for a few days whenever I grind.

Update as of 9 Feb 2020:

I had said earlier that this post is about what I thought about the Skerton PRO. If you recall, I mentioned I had problems with finding the right grind size. When I had the grounds as filtered coffee, it tasted a tad weak. But when I grounded them finer, it was too fine. A friend had suggested I use the grounds in a cold brew.

I did that yesterday and it turned out to be the best decision ever. After cold brewing for 18 hours, the coffee was just nice, strong enough, a tad sour and I could taste the coffee for what it is. I guess adjusting the size of the grind is something that one has to experiment with to get the right grind size.

Okay, I’m awake now!

My first cold brew for the year! YEAH!

What not to do when ‘Puck’ing a cold drip.

Knowing my interest in cold drip coffee, some friends gave me a Puck Puck a year ago. I did not get a chance to test it out until today. Just the other day, I had decided to throw out the water bottle where I had cut the base, thinking that I no longer needed it now that I have Puck Puck.

In one year that I had left the gadget in storage, the blue colour had become a little discoloured. There were now streaks of white across the blue. Since I had a water bottle on hand, I fitted it onto Puck. It fitted well. After removing the water bottle again, I proceeded to chill it. After that, I attached it onto Puck, turned it upside down and slit the base of the bottle that is now on top. Then, I made my first mistake. I did not remove the blue filter. I proceeded to adjust the drip, or I should say I tried to adjust the drip but I could not get it to drip. Instead, water just flowed down the sides, both inside and outside. This is what happens when one does not watch videos on how to use Puck Puck before attempting to use it.

Taking it to the sink to better find the correct drip rate, I soon lost all the water in the bottle. But not to worry, I had gotten the water container version since I was not sure if I wanted to keep buying Evian or Volvic water bottles for drip coffee and also, in case I did not have a water bottle on hand that would fit.

A common brand of mineral water being used with Puck.

The container version

I proceeded to fill up the container and added some ice. I still could not adjust the drip and water just flowed out through the side in a small stream instead. As you can see from the picture, the Aeropress container started filling up with water and I had to stop the drip.

Puck with a bandana!

Well, water was not just flowing inside the Aeropress, it was also coming out through the air holes and flowing out on the outside of the Aeropress. I rolled a piece of paper towel and wrapped it around the outside to prevent the water from flowing into the jug from the outside!

After trying to figure out what the problem was, I decided to remove the filter. In a YouTube video, I saw that this piece of plastic was placed inside the Aeropress on top of the coffee where I had placed a second piece of filter paper. Oops, my bad! No wonder the water was flowing down the sides and not the middle.

This presumably is supposed to help the water spread more widely and evenly. The water started dripping from the middle after I removed this. Duh!

After that, the water started to drip from the middle, and then flowed, and then dripped. This sequence would repeat itself. I would get a consistent drip, then it would stop and suddenly there would be a little stream of water, and then it would drip again. By the time, the water from the container emptied, I had cold immersion coffee instead.

The next day, I decided to try using Puck Puck again after watching a video on YouTube. I followed the steps and the blue filter went into the Aeropress as it should. The water dripped as it should though I wished it was more consistent. Considering that this is not an expensive piece of equipment, I decided that the drip was acceptable. I would probably cover the top container and the bottom, leaving the drip bit visible so that I can keep the ice water and cold coffee cold for as long as I could, being in a temperate climate country. But be careful when throwing out the used grounds that the blue filter is not accidentally thrown out as well. Do watch videos – there are several on Youtube – on how to use Puck Puck before you start using yours!

This little gooseneck came by

I waited impatiently for it to arrive. One missed delivery and two emails later, the item arrived at my doorstep. Opening up the box, there it was, sitting pretty next to the coffee.

The next morning, I made my cuppa and poured boiling hot water into the little gooseneck to heat it up. After emptying out the hot water, I poured in some more hot water. The amount was enough for one cup of coffee.

It was amazing to see the thin stream of hot water coming out of the long spout. Amazing because I have not used one before and I was surprised that it was so easy to control. The kettle did not come with a cover and so I improvised and put my silicone cover on top of it as I poured so that I could keep the water hot for longer. Not the most aesthetically pleasing solution but it worked. The handle also got a little warm but not hot enough that I needed a holder to protect my hand. However, if I was serving multiple cups in this manner, I may need to get a holder or grip for the handle or use a larger gooseneck. For now, I am one happy owner.

This little fella came with the Hook Coffee Advent calendar, except that there was no calendar, just a sheet of cute stickers with their equally cute company name and logo on it. I bought it as a gift. I think the company is brilliant in its approach and marketing. The coffee is a tad too expensive for pragmatic me — I just want the coffee — but it has its appeal. It is nice to look at, hip and definitely instagrammable. I am also more comfortable with the Japanese drip coffee that comes in 7g or 8g. Hook Coffee drip bags come in 10g, which is a tad too strong for me. However, as a newish young company, I think their idea is refreshing and courageous which I applaud. They have managed to make coffee colourful and trendy in a very competitive market. And yes, I would get their coffee for special occasions or when I need a lovely gift. And no, I am not rewarded in any way for mentioning them in this blog. This is just my way of supporting local efforts.

I wonder when their next promotion is.

Update:

A friend who read my post asked me why the little gooseneck has no cover. I told the person it is because the container holds hot water for only one cup, hence a cover is not necessary. But because I wanted to keep the hot water hot for longer, I have since improvised and am using my Vietnamese coffee maker cover to cover the little gooseneck when I pour out the hot water. It looks good now!

Update 2:

It’s December 1. This is what the inside of the box looks like. There was no calendar. Now to make my cuppa. Hmm… which one shall I start with?

Cold Brew Coffee (vs cold drip coffee)

After I saw my friend’s Hario bottle of cold immersion coffee, I started looking for parts that I could get to make my own cold brew coffee. I wanted a glass bottle or jar that was larger so I could have more coffee to drink, and glass that was thicker so it would not break easily. In the end, I settled for a stainless steel filter, a large Ball mason jar and a flip cap that did not fall and interrupt the flow of coffee during pouring.

cold brew 4


Filter within the Ball mason jar. The coffee powder is placed within the filter.

I used my usual organic coffee powder which is a light to medium roast, with a ratio of 1.5 cups of coffee powder to 8 cups of cold water. I actually had trouble filling 8 cups of water into the jar so it is less than 8 cups of water but the cold water is filled up to the neck of the bottle. The cold water has to be added slowly. Give the water time to seep through the filter into the jar. Slowly fill the water up to the neck of the bottle if you are using the ratio above. If the coffee is too strong, it can be diluted. But if the coffee is too weak, there is nothing that can be done about it. I brewed it for 18 hours.

My conclusion:

  1. The filter could not filter out residue coffee powder that had seeped through the filter into the coffee itself. As a result, the coffee that was near the base of the bottle was stronger and more bitter than the coffee that was above. The coffee could be filtered but it was a slow process and the residue was very fine.coffee residueThe coffee residue was very fine and when accumulated at the bottom of the paper filter, it slowed down the flow of coffee considerably.
  2. I read on the internet that some people use a ‘sock’ (not those that you wear on your foot) and even paper towels to filter the coffee. I did not do that with mine.
  3. Coffee oils are also not filtered out, unlike when a paper filter is used. This may or may not bother you. It does not bother me.
  4. Because the bottle is much larger, there is more coffee to drink, as I am not willing to ruin another water bottle to make a larger amount of cold drip coffee. I could just add more water to my 500ml water bottle but I usually do not.
  5. I prefer the consistency of cold drip coffee to cold brew coffee. I did not like the residue remains of the coffee getting into my drink and the bottom bit tasting more bitter than the rest of the coffee so care has to be taken when pouring the coffee.
  6. The longest I would cold brew the coffee is up to 18 hours. The suggested time is between 12 to 18 hours. I think if the coffee is not steeped long enough, the strength will not be there and if it is steeped past 18 hours, it can get too bitter.

So when does one do one and not the other? I think when a packet of coffee is just opened, I would cold drip it as the coffee is freshest then. If the packet has been opened for a while, I might cold brew it. However, if I am having several people over and I need more cold coffee, I’d cold brew it. There is no hard and fast rule — as one wishes, really.

Update: I found myself cold dripping my coffee when there is not enough coffee powder left in the packet to make a full bottle of cold brew.

So there you have it — cold brew versus cold drip coffee!

Slow Cold Drip Coffee DIY

I have my friend to thank for this. She had gotten herself a Hario and was telling me about how her cold coffee tasted. The Hario that she got was actually used to make cold immersion coffee where you pour cold water into coffee grounds and keep it in the fridge for 8 to 24 hours. I was quite sure that was not what I understood to be true cold brew coffee. I thought proper cold brew coffee should be cold drip coffee. I then decided to look for a way to make it the DIY way. I came across this in my search. Towards the bottom of the article, it talks about DIY cold drip coffee. Feeling quite pleased that some people used an Aeropress, plastic water bottle and cold water, I thought I would attempt it as well.

I did not want to use a disposable plastic waterbottle with a pricked hole in the cover, so I decided to use a proper waterbottle instead. In my first attempt, I used a 750ml sports waterbottle but that attempt was a complete failure as I did not take into consideration the vacuum effect which eventually stopped the water from dripping. Duh!

So I decided to cut open the bottom of another unused water bottle to pour my cold water into. I then adjusted the spout of the waterbottle to a reasonable drip rate. These are the steps I took but you may follow the link I posted earlier as well.

1.Wet the paper filter for the aeropress, put it into the cap and screw that onto the main holder of the aeropress.

I used a ratio of 1:8 for my coffee grinds and water. When the coffee powder reached reading no. 1 on the aeropress, I then leveled out the powder and placed a second piece of filter on top of the coffee powder. This is important as it prevents the coffee powder from splashing up when the water is dripped in. In the last picture below, bits of coffee powder got splashed up onto the sides. The filter also evens out the flow of water from the drip so that it covers more areas instead of only one part.

2. Pour in 500 ml of cold water into the waterbottle, which is the estimated 1:8 ratio. Cover the waterbottle so that the cold will last a little longer. Make sure the spout is closed when you pour in your water.

3. Adjust the spout such that the drip rate is about 45 drips to 1 minute. This was not easy to do as either too much or too little water came out. You can adjust the spout over the coffee powder or over the sink. If you adjust over the coffee powder, you can use the initial water that comes out to wet the powder. Be careful that you do NOT put in so much water until the coffee starts to drip out from the bottom. Just have enough water to wet the powder but not to start the drip yet. This helps to bring out the flavour of the coffee a little more evenly. If you think the coffee powder is already wet enough but you have not been able to get a decent drip rate, move the waterbottle over a glass bottle and adjust the drip rate. Once you are happy with a drip rate of 1 drip every 1-3 seconds or 45 drips to 1 minute, then move it back over the coffee powder. Or if you want to leave the coffee powder to saturate a little longer, then let the water drip into the glass for a while first. You can always pour the water back into the bottle when you are ready to start dripping into your coffee. I found that leaving the coffee saturated for 5 to 10 minutes before the dripping actually starts going through to the collection bottle below made the coffee taste better. Here is an article on cold blooming the coffee powder. I thought blooming required water at higher temperatures but perhaps it is not always necessary.

4. When you are happy with the drip rate, you can then leave it to drip for a few hours. I have not timed how long it would take to finish dripping. But do check the drip occasionally to ensure that it does not stop dripping.

The early part of the dripped coffee will be much stronger than the latter part. So if you are going to pilfer the early parts, don’t take the whole lot cos those who drink the latter parts will find that the coffee may not be strong enough. Best to leave the whole thing to drip until it is done and then mix the dripped coffee up before serving.

What I did not do:

  • I did not measure the temperature of the water for the dripping. I basically used cold water with some ice cubes in it.
  • I could not control the drip rate very well. I have ranged from 1 drop every 8 seconds (yawn!) to a slow trickle which I had to immediately shut off and retry. This was when I first tried it and I used that to saturate the powder so it turned out fine.
  • I do not roast or grind my own coffee. I used an organic medium roast for this.

Enjoy!

P.S. There is a small device called PuckPuck made by a UK creative design company that is used with the Aeropress to make cold drip coffee easier. You can find out more about it here. A frustrating part of this process is adjusting the consistency of the drip and this little device may just solve that problem. (This publicity is free. I was not paid nor given anything for it.)

Sous vide coffee attempts

I chanced upon a recipe on sous vide coffee while reading a post by someone who tried sous vide coffee with the Anova. I first tried it with some organic coffee that someone had gifted me from England. After I had sous vide it, I kept it in the fridge and drank it as cold coffee. I loved it and thought I would try to make some more.

Another friend had gifted me with some coffee from the Middle East. Without thinking, I followed the same ratio as the coffee I had used before and proceeded with the sous vide. After a couple of hours, I cooled the coffee and proceeded to filter it. That was when I started noticing something was different with this coffee. The residue was so fine that the filter could not filter everything out. And because it was so fine, it took forever to filter. In fact, I had to filter one lot twice as some of the residue went through the filter. In the end, I left it to drip for hours. I found out what I had been given was Arabic coffee (after I YouTubed to find out how to make it) and the coffee was produced in Jordan. I learnt that to drink it, it had to be brought to a boil and then covered and cooled slightly before it is served. Here I was with almost two jars full of sous vide Arabic coffee that I had just made at 65.6 degrees C.

I was in a dilemma. Do I throw the whole thing out or do I try and still have it as cold coffee? Perhaps I should try and see what the difference in taste is first, between how Arabic coffee is normally made and my sous vide version.

I did not have a pot dedicated to boiling coffee so I washed out a pot that I normally used for boiling rice. According to the instructions on the packet, I am supposed to add a teaspoon of coffee powder to 60 ml of water. That was a very small amount, small even for my smallest pot. I decided to do a ratio of 1:8, which was the ratio I had used for the sous vide coffee. I used 1/4 cup coffee to 2 cups water. Due to the different methods of doing Arabic coffee on YouTube, I decided to boil mine until a nice froth had formed and I continued simmering it for about 10 minutes instead of 20 minutes. I noticed that the longer I simmered the coffee, the darker the froth became. So I stopped after 10 minutes and just let the coffee rest for the other ten minutes.

saffron coffee3

Firstly, I was amazed at the colour difference. I guess the reason why the boiled version ended up being lighter than the sous vide version may be due to the time that the coffee powder was in contact with the water. Sous vide coffee was made over two hours, while the boiled version was made over 20 minutes. (Side note: Apparently, Arabic coffee is only lightly roasted, which is why the colour of the roast is lighter than other coffees I have used for filter coffee. The light colour of the roast is not evident in this photo. Arabic coffee that is correctly prepared looks more like tea without milk).

The coffee packet I received already had spices added into it. In comparing the boiled version with the sous vide version, I thought the coffee taste was more obvious in the boiled version than in the sous vide version.

From what I had read before, boiling coffee tends to burn it, which is why sous vide coffee is supposed to be better for folks with stomach problems as it is less acidic. I am not sure if adding spices would moderate that somewhat. Boiling coffee also supposedly burns the coffee. In making Arabic coffee, depending on which YouTube video one follows, the coffee is either just brought to the boil or it is simmered for up to 20 minutes. Spices are added after that. This explains why the taste of coffee seems more obvious (as in the taste comes out more) in the boiled version than in the sous vide version. However, while the taste may be more obvious, it may actually be less concentrated due to the shorter contact time the coffee powder has with the water.

Which one do I prefer? I think I prefer the boiled version though I would not let it simmer throughout the 20 minutes. I am inclined to just bring it to the boil, turn off the fire, cover the pot and leave it for that 20 minutes. I tend to drink my coffee with milk and I do not add sugar.

What shall I do with my sous vide coffee then? I would probably heat it up a little in the microwave and drink it with milk, without sugar, and tell myself to check the coffee I am going to sous vide before my next attempt. Perhaps I should invest in a smaller pot for boiling coffee next.

Tealightful!

The lovely fragrance of floral teas greeted us as we opened the door. The place was crowded on a wintry Saturday afternoon. Seated at the counter, we struck up an engaging conversation with the server who happened to be the owner. Seeing that I was not local, she spoke English and graciously translated the names of tea for me verbally. We were too late for the lunch sets which had more savoury options. We soon settled for an afternoon tea set. Though we only ordered one cup of tea and a tea set, we were given several different types of tea to sample which I thought was rather generous. We were particularly fascinated with moringa tea, having tasted moringa powder before which we disliked due to its strong unpleasant taste. But the herb itself was known for its numerous medicinal and health benefits and we asked the owner her opinion on the herbal tea. She offered us a tea blend of moringa, strawberry and something else whose name I forgot. The taste was rather pleasant as the moringa was present in a far more palatable amount, this being a tea blend.

The scone set turned out to be just nice and delightful. The scones themselves were light – not too buttery nor heavy unlike some scones I’ve tasted elsewhere – and slightly crunchy and coupled with tea sauce and whipped cream that could also be eaten with a tinge of salt, they turned out to be the perfect afternoon tea set.

I must confess that my knowledge of tea is limited to common ones found in supermarkets like Boh, Dilmah, Twinings and TWG (which is not found in supermarkets). This shop, Echelon Tea House, was like a boutique tea house for Mlesna tea and represented the brand very well.

We left happy and bought more tea as gifts for friends – a tealightful afternoon indeed. And I know just who to recommend this tea house to.

Echelon Tea House shopfront

Echelon Tea House

3 Chome-34-3 Yoshinohonchō, Tokushima-shi, Tokushima-ken 770-0802

Tel: 088-652-7078

Sous vide attempts

I first came across the word when a friend related to me a perfect meal of grilled beef that he had been served at another friend’s place. That friend had taken out a packet of vacuum sealed meat from the fridge, heated it up, seared it and served it perfectly. Piqued with curiousity, I decided to read up more on this method of cooking. Even though all I had on hand then was my airfryer, I decided to try and replicate some of the steps to do a ‘sous vide’ in my airfyer, using baking paper instead of vacuum sealed plastic bags. Without a thermometer on hand, I had to estimate the water temperature and then estimate how much I had to set my airfryer temperature to, in order to keep the water at a certain temperature. It was rather fun to try this and the result is below.   

I am putting the method here in [ ] for those who are interested. The photo shows the result after a second attempt. 

[First, I prepared the steak and marinated it. Then I boiled water until it was steaming, i.e. steam was coming out of the surface of the water but no bubbles had formed in the water yet. Hence, it is not boiling yet. According to what I read, this was probably between 75-85C. This was something I could visually estimate so I used this as a gauge. Singapore is at sea level so the altitude does not affect boiling temperature.
Then I put the water into my baking pan and put my 200g steak onto baking paper and lowered it into the water. Add in a little water first. The meat will not sink to the bottom as it is supported by the water.

Then I put another piece of baking paper on top of the meat and poured the hot water onto it. The weight of the water in the second piece of paper should allow you to shape the paper on top of and around the meat and you should be able to get most of the air out. I am trying to simulate the vacuum effect here though this is not airtight. I am trying to ensure the water in the second piece of paper is in contact with as much of the meat as possible WITHOUT being in direct contact with the meat. If there is not enough water at the bottom, you can add more hot water but make sure it does not overflow. Secure the papers to the side with stainless steel paper clips. Trim off the extra paper by following the shape of the pan.

Then I turned on the airfryer to 130C, for one hour. (Based on what I found out, this temperature would keep the water in the 70-80C range. Without a thermometer, this was just my estimate.) After one hour, remove the meat.

Turn up the oven to 200C. Baste the meat with whatever seasoning or sauce you want, then sear the meat on both sides! Voila! Airfried ‘sous vide’!]

Steps on how I tried ‘sous vide’ in an airfryer


To find out about sous vide, please click the link

Pleased with my first attempt, I decided to buy the necessary equipment in order to do it better. I purchased a gadget that could measure and control temperature off Amazon for under USD$30. There is a temperature probe attached that would cause the electricity supply to cut off once the desired temperature is reached. I plugged in my rice cooker into the socket and placed the probe into the water.

My rice cooker socket is plugged into the controller. The temperature has been set and it controls the switch on the rice cooker.


Temperature probe in the water of the rice cooker


Temperature measure and controller relay unit


The first attempt did not turn out well as the cut of meat was too thin and it was not exactly a good cut either.


I then tried it with a cut of lamb that was almost 2 inches thick and I cooked it at 54.5C for 21 hours. The result was much better. The meat was really tender and almost fell off the fork.


This was another attempt where I cooked another piece of meat for about 2 hours at 54.5C. It was too rare for my liking.


I finally tried cooking it at 58C for 1 hour. Bingo! I think I found the temperature that I am happy with. This is not too rare.


What I learned from trying to cook sous vide with beef and lamb.

  • Use good cuts of meat if you are going to cook the meats for 40 minutes to an hour. They should be one inch thick. I tried rib eye. Meats that are less than one inch thick do not seem to sous vide well. 
  • For thicker cuts of meat, they can be cooked for longer than 2.5 hours to days even, especially for tougher cheaper cuts.
  • 54.5C is the minimum sous vide temperature as that is the temperature that will pasteurise the meat when cooked for an hour. I have been rather nervous about cooking at this temperature as I worry that it will not kill the bacteria. I am a lot happier cooking at 58C plus I do not like my meat to be too rare.
  • Sous vide plastic bags seem rather difficult and expensive to get in Singapore. I use sealable Glad bags that are suitable for freezing and food marinade as they are made in the US and I like the quality a little more than the other brands around. I will still get proper sous vide plastic though as once I tried to sous vide potatoes at 90C and the bags got rather hot and I was concerned they could not take the temperature.
  • To vacuum seal the meat without proper equipment, I placed the meat in a sealable bag and then I lowered the bag into the water up to the seal. The water will push out all the air from the bag. Seal the bag on one end first and as the water pushes the rest of the air out, seal the other end. Be careful not to let any water into the bag as you are sealing it.
  • There is a whole range of sous vide equipment available. I picked a temperature and thermostat controller that I could use with an existing rice cooker or slow cooker. How serious you want to be with sous vide cooking is entirely up to you. I did not want an expensive white elephant in case I lost interest so I decided on something small and inexpensive first. However, it is important to get a reliable one so check out the reviews on the item. Some pieces of equipment come with a built-in circulator as well as temperature control. The built-in circulator is important as it keeps the temperature constant through circulating the water, ensuring that the meat cooks evenly. This also allows more pieces of meat to be cooked at one time. If I am to get a better piece of equipment, I would probably get one with a circulator.
  • There is also a lot of information available on the internet so do read up on the different temperatures to use especially for the different types of meat or dishes that you want to prepare. There are also youtube videos available. So have fun and feel like a king as you tuck into juicy and tender cuts of meat that used to be enjoyed only by those who could afford it.

Disclaimer: The information here is from my limited experience of sous vide attempts. I hope that what I have learned would help to shorten somebody else’s learning curve.

Give it a shot!

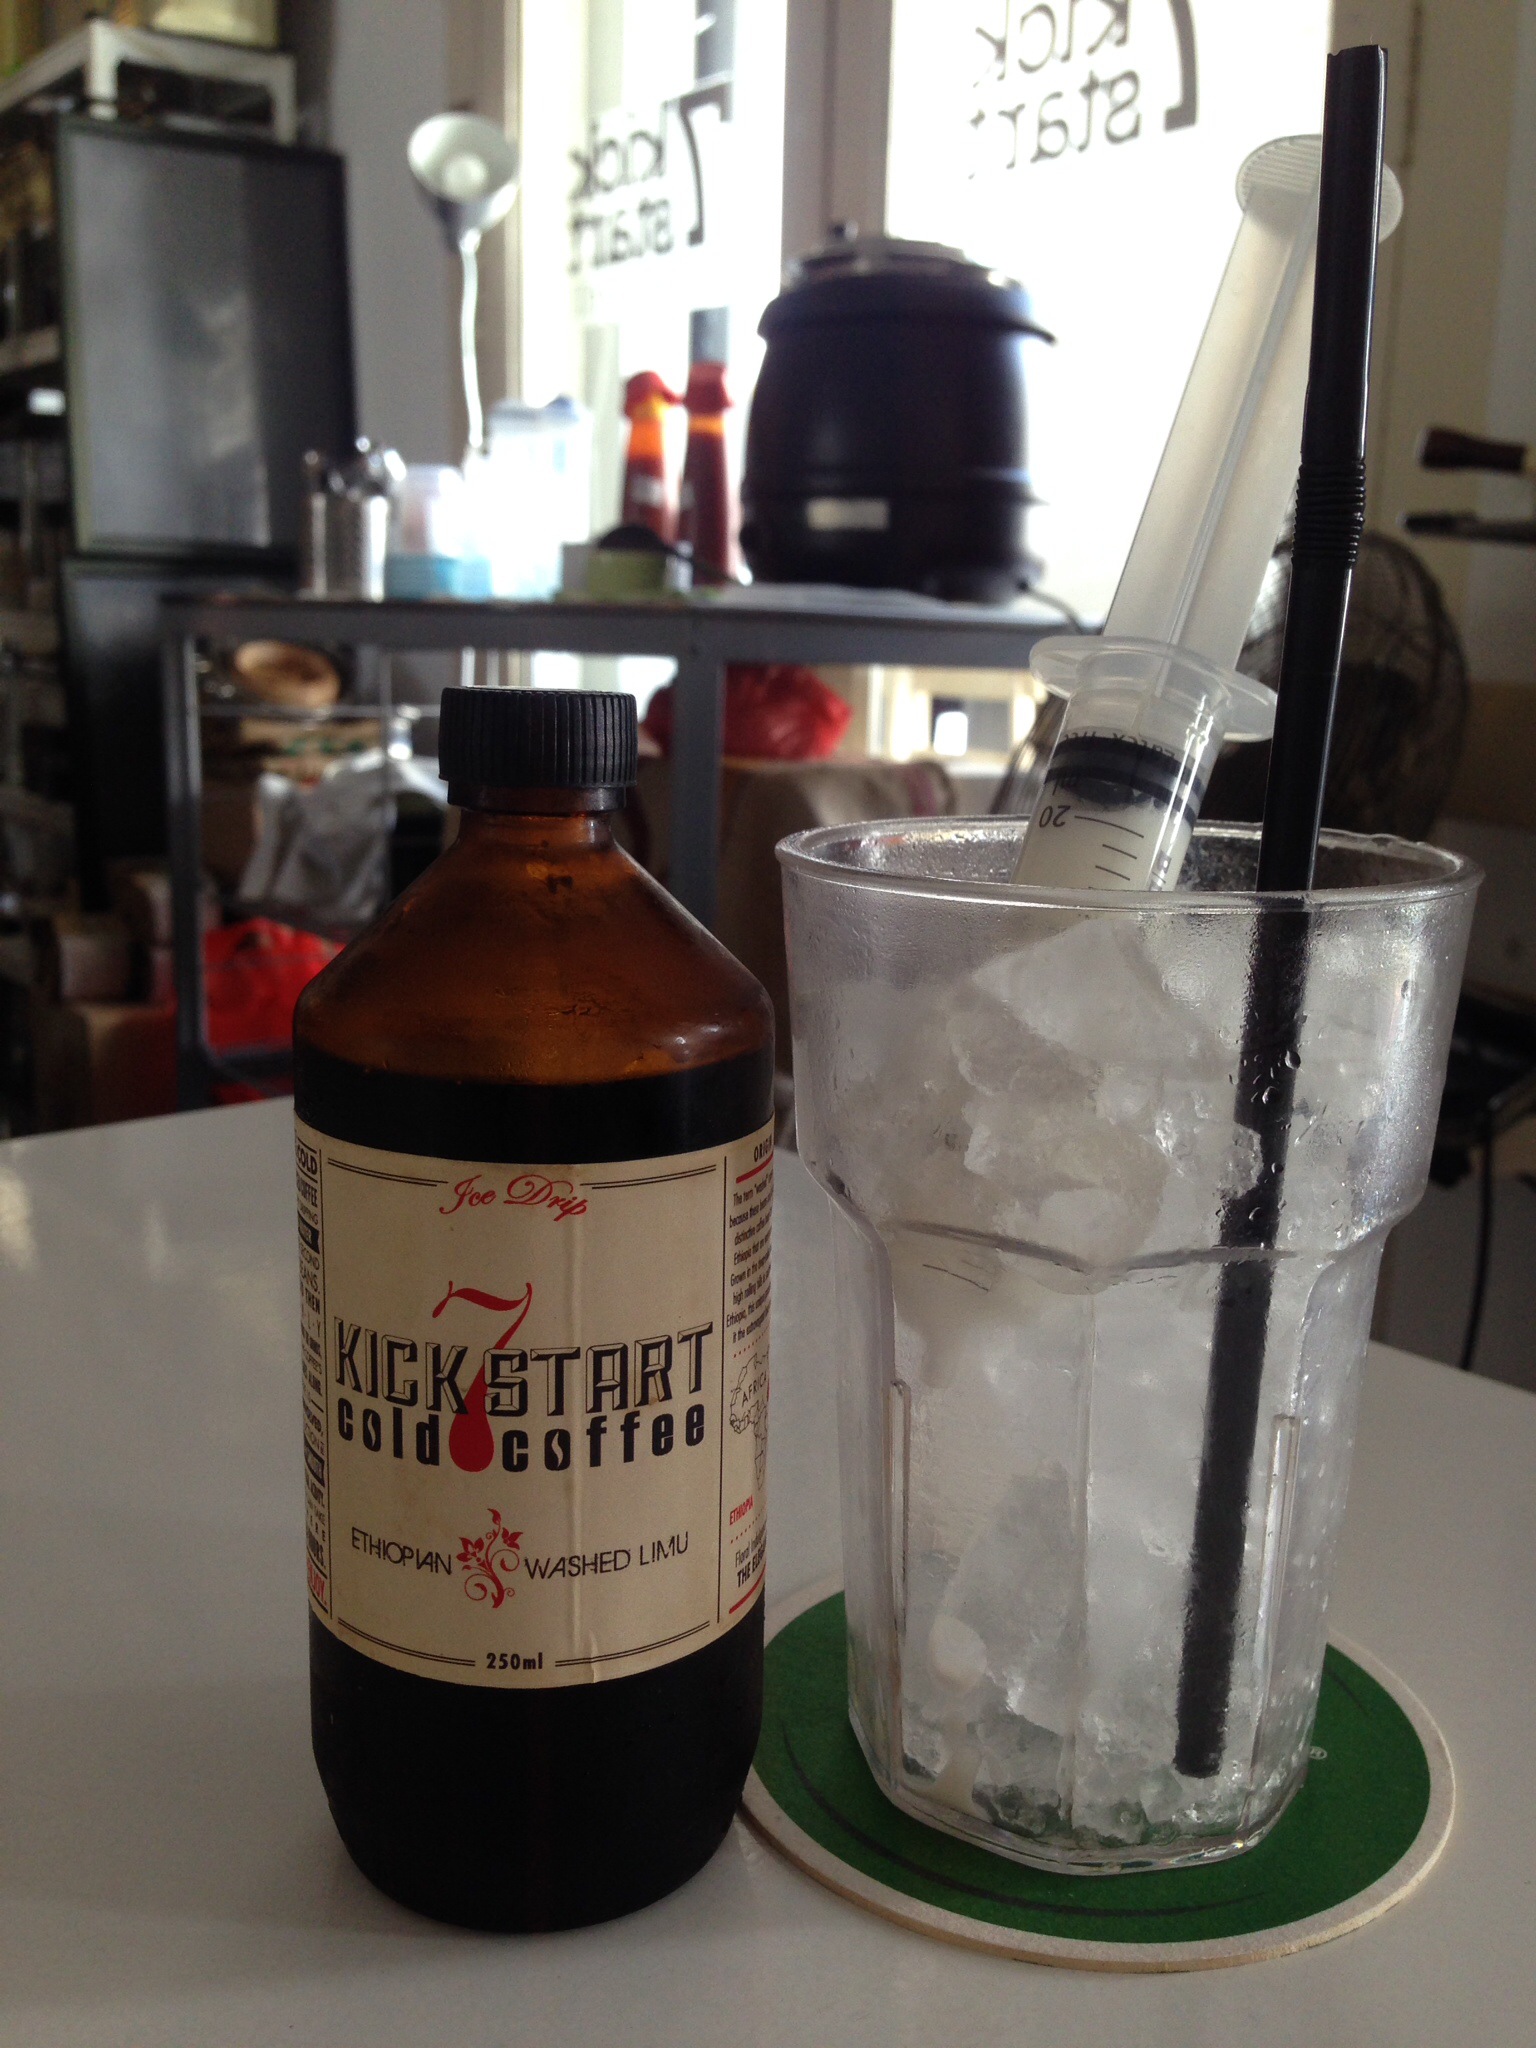
I have been quite amazed seeing the different ways iced coffee is being served nowadays. Here are two samples. The third one is my own attempt at replicating one of them. 

Iced coffee served with a syringe of milk


I was quite intrigued by the idea and the coffee was intoxicatingly good. The milk was insufficient for me and I asked them for a second syringe which they happily obliged. My friends and I ate there as well and here are some food pics.  

Their signature stabbed burger with charcoal buns!

Fish and chips


I was more intrigued by their coffee. Check out this cafe at 7 Kick Start, 71 Bras Basah Road.

Then there is another cafe that served their shots in the form of ice cubes! Another novel idea. 


Since it was already late at night, I settled for one ice cube instead of two. Being hot and humid here, it didn’t take long for the ice cubes to melt.

This is at Whisk & Paddle, 10 Tebing Lane, #01-01, Singapore 828836. Phone: +65 6242 4617.

Feeling rather inspired, I decided to try my own ice cube coffee with azuki beans. I’ve put all the photos together for easy reference, just for an idea!  

First, make some percolated or dripped coffee. Then, freeze them into ice cubes. When ready, put some cubes into a cup. Add milk and red beans. Top up with ice. 

Give this a shot for a different way to enjoy your iced coffee!